合 PG 14 + Pgpool-II + Watchdog 实现高可用(自动故障转移+读写分离+负载均衡)
Tags: PG高可用Pgpool-IIPG 14pgpoolAdmin读写分离负载均衡Watchdog单点故障自动转移
简介
Pgpool-II是一个在PostgreSQL服务器和PostgreSQL数据库客户端之间工作的中间件。它是根据BSD许可证授权的。它提供以下功能。
连接池
Pgpool-II保存与PostgreSQL服务器的连接,并在具有相同属性(即用户名,数据库,协议版本)的新连接进入时重用它们。它减少了连接开销,并提高了系统的整体吞吐量。
复制
Pgpool-II可以管理多个PostgreSQL服务器。使用复制功能可以在2个或更多物理磁盘上创建实时备份,以便在磁盘发生故障时服务可以继续运行而不会停止服务器。
负载均衡
如果复制了数据库,则在任何服务器上执行SELECT查询都将返回相同的结果。Pgpool-II利用复制功能,通过在多个服务器之间分配SELECT查询来减少每个PostgreSQL服务器的负载,从而提高系统的整体吞吐量。充其量,性能与PostgreSQL服务器的数量成比例地提高。在许多用户同时执行许多查询的情况下,负载平衡最有效。
限制超出连接
PostgreSQL的最大并发连接数有限制,连接在这么多连接后被拒绝。但是,设置最大连接数会增加资源消耗并影响系统性能。pgpool-II对最大连接数也有限制,但额外连接将排队,而不是立即返回错误。
看家狗
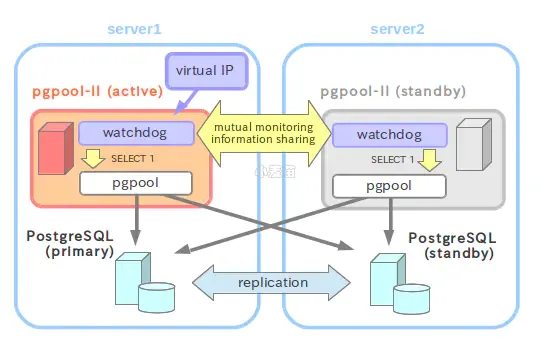
Watchdog可以协调多个Pgpool-II,创建一个强大的集群系统,避免单点故障或脑裂。看门狗可以对其他pgpool-II节点执行生命检查,以检测Pgpoll-II的故障。如果活动Pgpool-II发生故障,则可以将备用Pgpool-II提升为活动状态,并接管虚拟IP。
在内存查询缓存中
在内存中查询缓存允许保存一对SELECT语句及其结果。如果有相同的SELECT,Pgpool-II将从缓存中返回值。由于不涉及SQL解析或访问PostgreSQL,因此在内存缓存中使用速度非常快。另一方面,在某些情况下,它可能比正常路径慢,因为它增加了存储缓存数据的一些开销。
Pgpool-II讲PostgreSQL的后端和前端协议,并在后端和前端之间传递消息。因此,数据库应用程序(前端)认为Pgpool-II是实际的PostgreSQL服务器,服务器(后端)将Pgpool-II视为其客户端之一。因为Pgpool-II对服务器和客户端都是透明的,所以现有的数据库应用程序可以与Pgpool-II一起使用。Pgpool-II讲述PostgreSQL的后端和前端协议,并在它们之间传递连接。因此,数据库应用程序(前端)认为Pgpool-II是实际的PostgreSQL服务器,服务器(后端)将Pgpool-II视为其客户端之一。因为Pgpool-II对服务器和客户端都是透明的,所以现有的数据库应用程序可以与Pgpool-II一起使用,几乎不需要更改其源码。
watchdog是pgpool的核心组件,watchdog在 pgpool方案中扮演非常重要的角色,当启动pgpool时会启动watchdog子进程,主要作用为:
- 和pgpool后端PostgreSQL数据库节点以及远程pgpool节点进行通信。
- 对远程pgpool节点是否存活进行检查。
- 当watchdog子进程启动时,对本地pgpool的配置和远程pgpool的配置参数进行检查,并且输出本地和远程pgpool不一致的参数。
- 当pgpool主节点宕机时,watchdog集群将选举出新的 watchdog主节点。
- 当pgpool备节点激活成主节点时,watchdog负责将VIP飘移到新的pgpool节点。
相关文章
之前发布过几篇有关pgpool的文章:
- 【DB宝60】PG12高可用之1主2从流复制环境搭建及切换测试
- 【DB宝61】PostgreSQL使用Pgpool-II实现读写分离+负载均衡
- PostgreSQL高可用之repmgr(1主2从+1witness)+Pgpool-II实现主从切换+读写分离+负载均衡
- 【DB宝72】pgpool-II和pgpoolAdmin的使用
- PG高可用之主从流复制+keepalived 的高可用
有关pgpool-II的相关文档:
架构
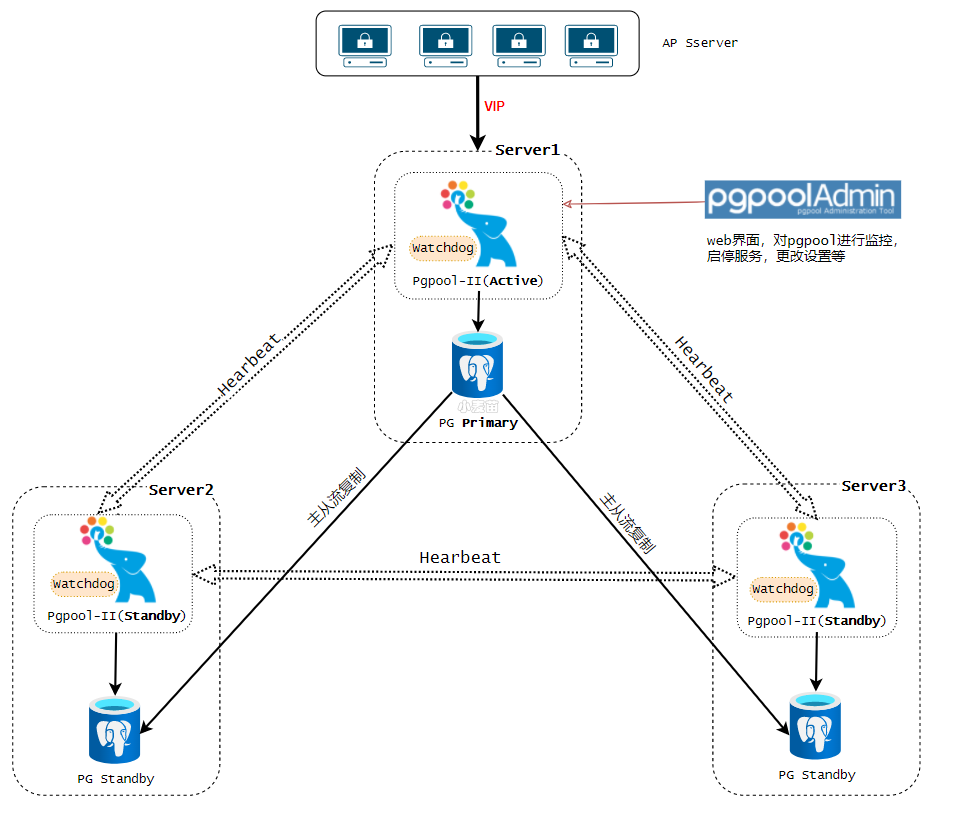
本节显示了使用Pgpool-II的流式复制配置示例。在本例中,我们使用3台Pgpool-II服务器来管理PostgreSQL服务器,以创建一个健壮的集群系统,并避免单点故障或脑裂。
本配置示例中使用了PostgreSQL 14。所有脚本都经过PostgreSQL 10及更高版本的测试。
我们使用3台安装了CentOS 7.6的服务器,server1、server2、server3。我们在每台服务器上安装PostgreSQL 14和Pgpool II。
我们假设所有Pgpool-II服务器和PostgreSQL服务器都位于同一子网中。
本文架构图如下所示:
Note:
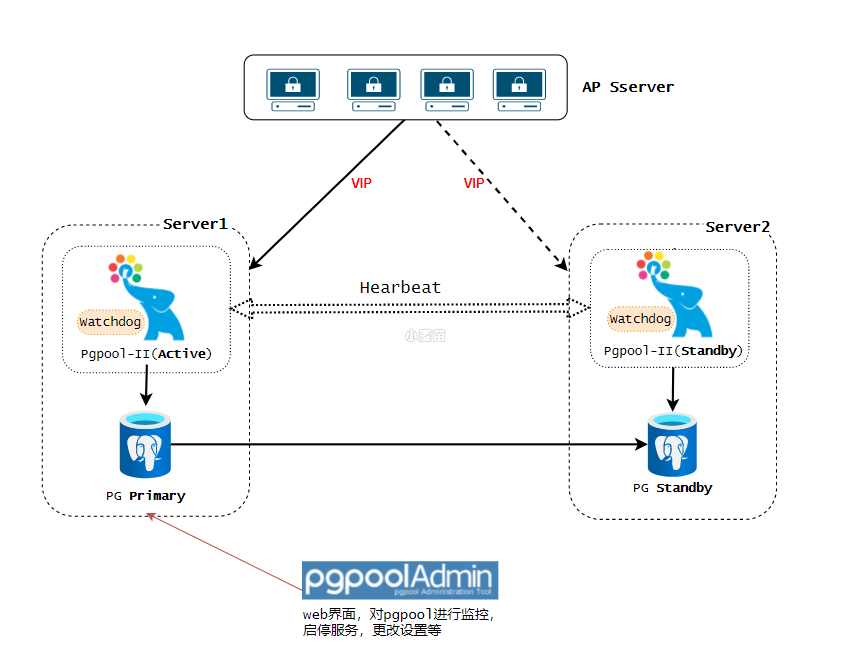
Active,Standby,Primary,Standby这些角色不是固定的,在后续的切换中是可以改变的。
如果是2个节点,那么架构可以变为:
Table 1. 主机及IP地址
| Hostname | IP Address | Virtual IP | 别名 |
|---|---|---|---|
| lhrpg30 | 172.72.6.30 | 172.72.6.35 | Server1 |
| lhrpg31 | 172.72.6.31 | 172.72.6.35 | Server2 |
| lhrpg32 | 172.72.6.32 | 172.72.6.35 | Server3 |
Table 2. PostgreSQL版本及配置
| Item | Value | Detail |
|---|---|---|
| PostgreSQL Version | 14.2 | - |
| port | 5432 | - |
| $PGDATA | /var/lib/pgsql/14/data | - |
| Archive mode | on | /var/lib/pgsql/archivedir |
| Replication Slots | Enable | - |
| Start automatically | Enable | - |
Table 3. Pgpool-II版本及配置
| Item | Value | Detail |
|---|---|---|
| Pgpool-II Version | 4.3.0 | - |
| port | 9999 | Pgpool-II accepts connections |
| 9898 | PCP process accepts connections | |
| 9000 | watchdog accepts connections | |
| 9694 | UDP port for receiving Watchdog's heartbeat signal | |
| Config file | /etc/pgpool-II/pgpool.conf | Pgpool-II config file |
| Pgpool-II start user | postgres (Pgpool-II 4.1 or later) | Pgpool-II 4.0 or before, the default startup user is root |
| Running mode | streaming replication mode | - |
| Watchdog | on | Life check method: heartbeat |
| Start automatically | Enable | - |
Table 4. 示例脚本
| Feature | Script | Detail |
|---|---|---|
| Failover | /etc/pgpool-II/failover.sh.sample | Run by failover_command to perform failover |
| /etc/pgpool-II/follow_primary.sh.sample | Run by follow_primary_command to synchronize the Standby with the new Primary after failover. | |
| Online recovery | /etc/pgpool-II/recovery_1st_stage.sample | Run by recovery_1st_stage_command to recovery a Standby node |
| /etc/pgpool-II/pgpool_remote_start.sample | Run after recovery_1st_stage_command to start the Standby node | |
| Watchdog | /etc/pgpool-II/escalation.sh.sample | Run by wd_escalation_command to switch the Active/Standby Pgpool-II safely |
上述脚本包含在RPM包中,可以根据需要进行定制。
1 2 3 4 5 6 7 8 9 10 11 12 13 14 15 16 17 18 19 20 21 22 23 24 25 26 27 28 29 30 31 32 33 34 | -- 网卡 docker network create --subnet=172.72.6.0/24 pg-network -- 申请主机 docker rm -f lhrpg30 docker run -d --name lhrpg30 -h lhrpg30 \ --net=pg-network --ip 172.72.6.30 \ -p 64330:5432 -p 9930:9999 \ -v /sys/fs/cgroup:/sys/fs/cgroup \ --privileged=true lhrbest/lhrcentos76:8.5 \ /usr/sbin/init docker rm -f lhrpg31 docker run -d --name lhrpg31 -h lhrpg31 \ --net=pg-network --ip 172.72.6.31 \ -p 64331:5432 -p 9931:9999 \ -v /sys/fs/cgroup:/sys/fs/cgroup \ --privileged=true lhrbest/lhrcentos76:8.5 \ /usr/sbin/init docker rm -f lhrpg32 docker run -d --name lhrpg32 -h lhrpg32 \ --net=pg-network --ip 172.72.6.32 \ -p 64332:5432 -p 9932:9999 \ -v /sys/fs/cgroup:/sys/fs/cgroup \ --privileged=true lhrbest/lhrcentos76:8.5 \ /usr/sbin/init [root@docker35 ~]# docker ps CONTAINER ID IMAGE COMMAND CREATED STATUS PORTS NAMES 84113aee6b76 lhrbest/lhrcentos76:8.5 "/usr/sbin/init" 50 seconds ago Up 47 seconds 0.0.0.0:64332->5432/tcp, :::64332->5432/tcp, 0.0.0.0:9932->9999/tcp, :::9932->9999/tcp lhrpg32 cb9e1aa0798b lhrbest/lhrcentos76:8.5 "/usr/sbin/init" 52 seconds ago Up 50 seconds 0.0.0.0:64331->5432/tcp, :::64331->5432/tcp, 0.0.0.0:9931->9999/tcp, :::9931->9999/tcp lhrpg31 f2b458ef2e7d lhrbest/lhrcentos76:8.5 "/usr/sbin/init" 55 seconds ago Up 52 seconds 0.0.0.0:64330->5432/tcp, :::64330->5432/tcp, 0.0.0.0:9930->9999/tcp, :::9930->9999/tcp lhrpg30 |
安装Pgpool-II和PostgreSQL 14
我们使用yum来安装Pgpool-II和PostgreSQL 14。
在3台机器都安装,如下:
yum安装PG 14.2
参考:【DB宝67】使用yum来安装PostgreSQL13.3数据库
1 2 3 4 5 6 7 8 9 10 11 12 13 14 | yum install -y https://download.postgresql.org/pub/repos/yum/reporpms/EL-7-x86_64/pgdg-redhat-repo-latest.noarch.rpm yum install -y postgresql14 postgresql14-server postgresql14-contrib postgresql14-libs /usr/pgsql-14/bin/postgresql-14-setup initdb systemctl disable postgresql-14 systemctl start postgresql-14 systemctl status postgresql-14 echo "postgres ALL=(ALL) NOPASSWD: ALL" >> /etc/sudoers echo 'export PS1="[\u@\h \W]$ "' >> /etc/profile echo "postgres:lhr" | chpasswd echo "export PATH=/usr/pgsql-14/bin:$PATH" >> /etc/profile |
yum安装pgpool-II
https://www.pgpool.net/yum/rpms/
https://www.pgpool.net/mediawiki/index.php/Yum_Repository
https://www.pgpool.net/docs/latest/en/html/install-rpm.html
1 2 3 4 5 6 7 8 9 10 11 | yum install -y https://www.pgpool.net/yum/rpms/4.3/redhat/rhel-7-x86_64/pgpool-II-release-4.3-1.noarch.rpm yum install -y pgpool-II pgpool-II-pg14-extensions -- 会安装如下四个包: Installing : libmemcached-1.0.16-5.el7.x86_64 1/4 Installing : pgpool-II-pcp-4.3.1-1.rhel7.x86_64 2/4 Installing : pgpool-II-4.3.1-1.rhel7.x86_64 3/4 Installing : pgpool-II-pg14-extensions-4.3.1-1.rhel7.x86_64 systemctl disable pgpool-II.service |
Note: 如果设置Pgpool-II自动启动,则需要将 search_primary_node_timeout更改为适当的值,以便在服务器启动后启动PostgreSQL。如果Pgpool-II在 search_primary_node_timeout期间无法连接到后端的PostgreSQL,它将失败。
准备工作
在server1操作即可。
配置归档
1 2 3 4 5 6 7 8 9 10 11 12 13 14 15 16 17 18 19 20 21 22 23 24 25 26 27 28 29 30 31 32 33 34 35 36 37 38 39 | su - postgres mkdir -p /var/lib/pgsql/archivedir -- 配置允许PG远程登录,注意版本: cat >> /var/lib/pgsql/14/data/postgresql.conf <<"EOF" listen_addresses = '*' port=5432 unix_socket_directories='/var/run/postgresql/' logging_collector = on log_directory = 'pg_log' log_filename = 'postgresql-%a.log' log_truncate_on_rotation = on archive_mode = on archive_command = 'cp "%p" "/var/lib/pgsql/archivedir/%f"' max_wal_senders = 10 max_replication_slots = 10 wal_level = replica hot_standby = on wal_log_hints = on password_encryption = 'md5' EOF cat > /var/lib/pgsql/14/data/pg_hba.conf << "EOF" # TYPE DATABASE USER ADDRESS METHOD local all all trust host all all ::1/128 trust host all all 127.0.0.1/32 trust host all all 172.72.6.0/24 trust host all all 0.0.0.0/0 md5 host replication all 0.0.0.0/0 md5 EOF sudo systemctl restart postgresql-14 systemctl status postgresql-14 |
Server1配置用户
Table 6. Users
| User Name | Password | Detail |
|---|---|---|
| repl | repl | PostgreSQL复制用户 |
| pgpool | pgpool | Pgpool-II health check (health_check_user) and replication delay check (sr_check_user) user |
| postgres | postgres | User running online recovery |
1 2 3 4 5 6 7 | psql -U postgres -p 5432 CREATE ROLE pgpool WITH LOGIN; CREATE ROLE repl WITH REPLICATION LOGIN; alter user postgres with encrypted password 'lhr'; alter user pgpool with encrypted password 'lhr'; alter user repl with encrypted password 'lhr'; GRANT pg_monitor TO pgpool; |
配置互信
1 2 3 4 5 6 7 8 9 10 | chmod +x ./sshUserSetup.sh ./sshUserSetup.sh -user root -hosts "lhrpg30 lhrpg31 lhrpg32" -advanced exverify -confirm ./sshUserSetup.sh -user postgres -hosts "lhrpg30 lhrpg31 lhrpg32" -advanced exverify -confirm cp /var/lib/pgsql/.ssh/id_rsa /var/lib/pgsql/.ssh/id_rsa_pgpool cp /var/lib/pgsql/.ssh/id_rsa.pub /var/lib/pgsql/.ssh/id_rsa_pgpool.pub chown -R postgres.postgres /var/lib/pgsql/.ssh/ cp /root/.ssh/id_rsa /root/.ssh/id_rsa_pgpool cp /root/.ssh/id_rsa.pub /root/.ssh/id_rsa_pgpool.pub |
pgpool配置
创建pgpool的密码文件
注意:/var/lib/pgsql为postgres用的家目录。
1 2 3 4 5 6 7 8 9 10 11 12 13 14 15 16 17 18 19 20 21 22 23 24 | -- 配置psql的密码 cat > /var/lib/pgsql/.pgpass <<"EOF" 172.72.6.30:5432:replication:repl:lhr 172.72.6.31:5432:replication:repl:lhr 172.72.6.32:5432:replication:repl:lhr 172.72.6.35:9999:postgres:pgpool:lhr 172.72.6.35:9999:postgres:postgres:lhr lhrpg30:5432:replication:repl:lhr lhrpg31:5432:replication:repl:lhr lhrpg32:5432:replication:repl:lhr lhrpg30:5432:postgres:postgres:lhr lhrpg31:5432:postgres:postgres:lhr lhrpg32:5432:postgres:postgres:lhr EOF chown postgres.postgres /var/lib/pgsql/.pgpass chmod 600 /var/lib/pgsql/.pgpass echo 'localhost:9898:pgpool:lhr' > /var/lib/pgsql/.pcppass chmod 600 /var/lib/pgsql/.pcppass chown postgres.postgres /var/lib/pgsql/.pcppass echo 'pgpool:'`pg_md5 -u=pgpool lhr` >> /etc/pgpool-II/pcp.conf |
创建pgpool_node_id
server11echo "0" > /etc/pgpool-II/pgpool_node_idserver21echo "1" > /etc/pgpool-II/pgpool_node_idserver31echo "2" > /etc/pgpool-II/pgpool_node_id
Pgpool-II参数配置
1 2 3 4 5 6 7 8 9 10 11 12 13 14 15 16 17 18 19 20 21 22 23 24 25 26 27 28 29 30 31 32 33 34 35 36 37 38 39 40 41 42 43 44 45 46 47 48 49 50 51 52 53 54 55 56 57 58 59 60 61 62 63 64 65 66 67 68 69 70 71 72 73 74 75 76 77 78 79 80 81 82 83 84 85 86 87 88 89 90 91 92 93 94 95 96 97 98 99 100 101 102 103 104 105 106 107 108 109 110 111 112 113 114 115 116 117 118 119 120 121 122 123 124 125 126 127 128 129 130 131 132 133 134 135 136 137 138 139 140 141 142 143 144 145 146 147 148 149 150 151 152 153 154 155 156 157 158 159 160 | cat > /etc/pgpool-II/pgpool.conf <<"EOF" backend_clustering_mode = 'streaming_replication' # - pgpool Connection Settings - listen_addresses = '*' port=9999 # - Streaming Replication Check sr_check_user = 'pgpool' sr_check_password = '' # - Health Check health_check_period = 5 health_check_timeout = 30 health_check_user = 'pgpool' health_check_password = 'lhr' health_check_max_retries = 3 search_primary_node_timeout = 10min # - Backend Connection Settings - backend_hostname0 = '172.72.6.30' backend_port0 = 5432 backend_weight0 = 1 backend_data_directory0 = '/var/lib/pgsql/14/data' backend_flag0 = 'ALLOW_TO_FAILOVER' backend_application_name0 = 'server1' backend_hostname1 = '172.72.6.31' backend_port1 = 5432 backend_weight1 = 1 backend_data_directory1 = '/var/lib/pgsql/14/data' backend_flag1 = 'ALLOW_TO_FAILOVER' backend_application_name0 = 'server2' backend_hostname2 = '172.72.6.32' backend_port2 = 5432 backend_weight2 = 1 backend_data_directory2 = '/var/lib/pgsql/14/data' backend_flag2 = 'ALLOW_TO_FAILOVER' backend_application_name0 = 'server3' # - Failover configuration failover_command = '/etc/pgpool-II/failover.sh %d %h %p %D %m %H %M %P %r %R %N %S' follow_primary_command = '/etc/pgpool-II/follow_primary.sh %d %h %p %D %m %H %M %P %r %R' # - Online Recovery Configurations recovery_user = 'postgres' recovery_password = 'lhr' recovery_1st_stage_command = 'recovery_1st_stage' # - Client Authentication Configuration enable_pool_hba = on pool_passwd = '/etc/pgpool-II/pool_passwd' # - Watchdog Configuration use_watchdog = on delegate_IP = '172.72.6.35' if_up_cmd = '/usr/bin/sudo /sbin/ip addr add $_IP_$/24 dev eth0 label eth0:1' if_down_cmd = '/usr/bin/sudo /sbin/ip addr del $_IP_$/24 dev eth0' arping_cmd = '/usr/bin/sudo /usr/sbin/arping -U $_IP_$ -w 1 -I eth0' hostname0 = '172.72.6.30' wd_port0 = 9000 pgpool_port0 = 9999 hostname1 = '172.72.6.31' wd_port1 = 9000 pgpool_port1 = 9999 hostname2 = '172.72.6.32' wd_port2 = 9000 pgpool_port2 = 9999 wd_lifecheck_method = 'heartbeat' wd_interval = 10 heartbeat_hostname0 = '172.72.6.30' heartbeat_port0 = 9694 heartbeat_device0 = '' heartbeat_hostname1 = '172.72.6.31' heartbeat_port1 = 9694 heartbeat_device1 = '' heartbeat_hostname2 = '172.72.6.32' heartbeat_port2 = 9694 heartbeat_device2 = '' wd_heartbeat_keepalive = 2 wd_heartbeat_deadtime = 30 wd_escalation_command = '/etc/pgpool-II/escalation.sh' # - Where to log - log_destination = 'stderr' logging_collector = on log_directory = '/var/log/pgpool-II' log_filename = 'pgpool-%Y-%m-%d_%H%M%S.log' log_truncate_on_rotation = on log_rotation_age = 1d log_rotation_size = 10MB pid_file_name = '/var/run/postgresql/pgpool.pid' #------------------------------------------------------------------------------ # LOAD BALANCING MODE #------------------------------------------------------------------------------ load_balance_mode = on EOF cp -p /etc/pgpool-II/failover.sh{.sample,} cp -p /etc/pgpool-II/follow_primary.sh{.sample,} chown postgres:postgres /etc/pgpool-II/{failover.sh,follow_primary.sh} chmod +x /etc/pgpool-II/{failover.sh,follow_primary.sh} cp -p /etc/pgpool-II/recovery_1st_stage.sample /var/lib/pgsql/14/data/recovery_1st_stage cp -p /etc/pgpool-II/pgpool_remote_start.sample /var/lib/pgsql/14/data/pgpool_remote_start chown postgres:postgres /var/lib/pgsql/14/data/{recovery_1st_stage,pgpool_remote_start} chmod +x /var/lib/pgsql/14/data/{recovery_1st_stage,pgpool_remote_start} su - postgres psql template1 -c "CREATE EXTENSION pgpool_recovery" psql postgres -c "CREATE EXTENSION pgpool_recovery" echo "host all all 0.0.0.0/0 md5" >> /etc/pgpool-II/pool_hba.conf -- cat /etc/pgpool-II/pool_passwd pg_md5 --md5auth --username=pgpool "lhr" pg_md5 --md5auth --username=postgres "lhr" cat > /etc/pgpool-II/escalation.sh <<"EOF" #!/bin/bash # This script is run by wd_escalation_command to bring down the virtual IP on other pgpool nodes # before bringing up the virtual IP on the new active pgpool node. set -o xtrace PGPOOLS=(172.72.6.30 172.72.6.31 172.72.6.32) VIP=172.72.6.35 DEVICE=eth0 for pgpool in "${PGPOOLS[@]}"; do [ "$HOSTNAME" = "$pgpool" ] && continue ssh -T -o StrictHostKeyChecking=no -o UserKnownHostsFile=/dev/null postgres@$pgpool -i ~/.ssh/id_rsa_pgpool " /usr/bin/sudo /sbin/ip addr del $VIP/24 dev $DEVICE " done exit 0 EOF chown postgres:postgres /etc/pgpool-II/escalation.sh chmod +x /etc/pgpool-II/*.sh chown postgres:postgres /etc/pgpool-II/*.conf |
故障转移配置
在failover_command参数中执行故障转移后要执行的shell脚本。如果我们使用3台PostgreSQL服务器,我们需要指定follow_primary_command,以便在主节点故障转移后运行。对于两台PostgreSQL服务器,不需要设置follow_primary_command。
1 2 | failover_command = '/etc/pgpool-II/failover.sh %d %h %p %D %m %H %M %P %r %R %N %S' follow_primary_command = '/etc/pgpool-II/follow_primary.sh %d %h %p %D %m %H %M %P %r %R' |
示例脚本failover.sh和follow_primary.sh安装在/etc/pgpool-II/中。可以使用这些示例文件创建故障转移脚本。
1 2 3 4 | cp -p /etc/pgpool-II/failover.sh{.sample,} cp -p /etc/pgpool-II/follow_primary.sh{.sample,} chown postgres:postgres /etc/pgpool-II/{failover.sh,follow_primary.sh} chmod +x /etc/pgpool-II/{failover.sh,follow_primary.sh} |
注意脚本failover.sh和follow_primary.sh中的PGHOME是否配置正确。脚本follow_primary.sh中的PCP_USER为pgpool。
Pgpool-II在线恢复配置
为了使用Pgpool II执行在线恢复,我们指定PostgreSQL用户名和在线恢复命令recovery_1st_stage。因为执行在线恢复需要PostgreSQL中的超级用户权限,所以我们在recovery_user中指定postgres_user。然后,我们在PostgreSQL主服务器(server1)的数据库集群目录中创建recovery_1st_stage和pgpool_remote_start,并添加执行权限。
1 2 3 | recovery_user = 'postgres' recovery_password = 'lhr' recovery_1st_stage_command = 'recovery_1st_stage' |
在线恢复示例脚本recovery_First_stage和pgpool_remote_start安装在/etc/pgpool II/中。将这些文件复制到主服务器(server1)的数据目录。
1 2 3 | cp -p /etc/pgpool-II/recovery_1st_stage.sample /var/lib/pgsql/14/data/recovery_1st_stage cp -p /etc/pgpool-II/pgpool_remote_start.sample /var/lib/pgsql/14/data/pgpool_remote_start chown postgres:postgres /var/lib/pgsql/14/data/{recovery_1st_stage,pgpool_remote_start} |
Basically, it should work if you change PGHOME according to PostgreSQL installation directory.
注意脚本recovery_1st_stage和pgpool_remote_start中的PGHOME是否配置正确。脚本follow_primary.sh中的PCP_USER为pgpool。
为了使用在线恢复功能,需要pgpool_recovery、pgpool_remote_start、pgpool_switch_xlog等功能,因此我们需要在PostgreSQL server server1的template1上安装pgpool_recovery。
1 2 | su - postgres psql template1 -c "CREATE EXTENSION pgpool_recovery" |
配置/etc/pgpool-II/pool_hba.conf
1 2 3 4 5 | -- cat /etc/pgpool-II/pool_passwd pg_md5 --md5auth --username=pgpool "lhr" pg_md5 --md5auth --username=postgres "lhr" |
Watchdog配置
1 2 3 4 5 6 7 8 9 10 11 12 13 14 15 16 17 18 19 20 21 22 23 24 | cat > /etc/pgpool-II/escalation.sh <<"EOF" #!/bin/bash # This script is run by wd_escalation_command to bring down the virtual IP on other pgpool nodes # before bringing up the virtual IP on the new active pgpool node. set -o xtrace PGPOOLS=(172.72.6.30 172.72.6.31 172.72.6.32) VIP=172.72.6.35 DEVICE=eth0 for pgpool in "${PGPOOLS[@]}"; do [ "$HOSTNAME" = "$pgpool" ] && continue ssh -T -o StrictHostKeyChecking=no -o UserKnownHostsFile=/dev/null postgres@$pgpool -i ~/.ssh/id_rsa_pgpool " /usr/bin/sudo /sbin/ip addr del $VIP/24 dev $DEVICE " done exit 0 EOF chown postgres:postgres /etc/pgpool-II/escalation.sh chmod +x /etc/pgpool-II/escalation.sh |
启动Pgpool-II
在启动Pgpool-II之前,请先启动PostgreSQL;在关闭PostgreSQL之前,请先关闭Pgpool-II


你好,请问这个方案没有部署witness,能够防止因网络波动导致的脑裂现象么?
不好意思,现在注意到watchdog可以防止脑裂了。
你好,在步骤“配置PostgreSQL主备库”中输入pcp_recovery_node -h172.72.6.30 -p 9898 -U postgres -n 提示输入密码,我输如 lhr 无法登录,
报“ERROR: connection to host "172.72.6.30" failed with error "Connection refused"”,请问正确密码是多少呢?如何解决?
谢谢!
[postgres@lhrpg30 ~]$ pcp_recovery_node -h localhost -p 9898 -U pgpool -n 1
Password:
172.72.6.30改为localhost输入密码lhr后报错
ERROR: executing recovery, execution of command failed at "1st stage"
DETAIL: command:"recovery_1st_stage"
执行命令也失败了
查询日志报
password authentication failed for user "repl"
2023-02-10 08:10:04.845 CST [864981 DETAIL: Password does not match for user "repl"。
底层pg_basebackup 密码错误
密码是lhr
你好,博主。密码文件我已经存储过了。
-- 配置psql的密码
cat > /var/lib/pgsql/.pgpass <<"EOF"
172.72.6.30:5432:replication:repl:lhr
172.72.6.31:5432:replication:repl:lhr
172.72.6.32:5432:replication:repl:lhr
172.72.6.35:9999:postgres:pgpool:lhr
172.72.6.35:9999:postgres:postgres:lhr
lhrpg30:5432:replication:repl:lhr
lhrpg31:5432:replication:repl:lhr
lhrpg32:5432:replication:repl:lhr :
lhrpg30:5432:postgres:postgres:lhr
lhrpg31:5432:postgres:postgres:lhr
lhrpg32:5432:postgres:postgres:lhr
EOF
现在的问题就是两个standy一直为down,我根据你的步骤pcp_recovery_node 想将两个从节点启动,就报错,看日志底层发现是pg_basebackup提示用户"repl"密码错误。请问有排查的方向么?
谢谢哈!
能否加微信咨询一下,有偿。
请问这个sshUserSetup.sh脚本是从哪里获取呢?
Oracle rac中有,或者我的资料里也有
具体在哪呀?
用这个吧:https://share.weiyun.com/Fnu88Gxe
看了非常多的PG+pgpool的帖子,
就这个验证成功。
谢谢你,辛苦了
您客气了