合 Linux下MySQL 5.5、5.6和5.7的RPM、二进制和源码安装
- 前言部分
- 导读和注意事项
- 本文简介
- Linux下各种安装方法比较
- 注意事项
- MySQL下载
- 历史MySQL版本下载
- MySQL 5.7安装
- 下载
- OS路径设置
- OS设置
- 上传文件并校验MD5值
- 安装
- 重命名安装后的文件夹
- 新建数据和日志文件目录
- 用户和组设置
- 改变目录属有者
- 初始化MySQL
- 生成秘钥
- 配置/etc/my.cnf
- 配置开机启动文件
- 启动MySQL
- 配置环境变量
- 登录MySQL并修改密码
- 设置远程登录
- Windows远程登录
- 客户端工具登录
- Navicat for MySQL
- MySQLWorkbench
- MySQL 5.6安装
- 下载
- OS路径设置
- 安装MySQL 5.6
- 初始化
- 配置参数文件并启动MySQL
- 修改密码
- 设置远程登录
- 远程登录
- MySQL 5.5安装
- 下载
- OS路径设置
- 安装MySQL 5.5
- 初始化
- 配置参数文件并启动MySQL
- 修改密码
- 设置远程登录
- 远程登录
- 配置多版本、多实例开机自启动
- 配置/etc/my.cnf
- 配置开机启动
- mysqld_multi命令
- 源码编译安装MySQL 5.7
- 下载源码包
- 增加用户
- 创建要安装的目录
- 上传并解压
- 安装编译环境所需要的包和一些依赖包
- 配置本地YUM源
- 安装依赖包
- 执行编译命令
- 升级cmake的版本
- 编译安装
- 初始化MySQL
- 配置/etc/my.cnf
- 启动MySQL
- 登录MySQL并修改密码
- 设置远程登录
- Windows远程登录
- 错误解决
- ABORT: Can't find command 'my_print_defaults'.
- 执行cmake编译时报错
- 参考文档
- 实验中用到的SQL总结
前言部分
导读和注意事项
各位技术爱好者,看完本文后,你可以掌握如下的技能,也可以学到一些其它你所不知道的知识,\~O(∩_∩)O\~:
① MySQL的二进制安装过程(重点)
② MySQL多实例管理(mysqld_multi)
③ MySQL的源码编译安装过程
④ Linux的逻辑卷的使用
⑤ 文件的MD5值
⑥ 访问MySQL的几种客户端工具(Navicat和MySQLWorkbench)
⑦ 修改MySQL的密码
⑧ 设置MySQL的远程访问
⑨ 设置MySQL的开机启动以及多实例的开机启动
⑩ RPM、二进制和源码编译的优缺点
本文简介
自从去年3月份开始写书到现在,基本上大部分内容都写完了。一个字,累!三个字,真心累!我也因此错过了很多的东西,当然也收获了很多,一切都随缘吧。现在来说说博客吧,虽然我的博客在这段时间更新比较频繁,但是大多内容都不是来自我的原创,基本都是整理自网络。可能有的朋友就会骂小麦苗了,抄袭抄袭,我不反驳,因为这的确是抄袭。为啥小麦苗要这么做,可能基于这么几个原因吧。第一,干货类的文章,本来原创的内容就少,网上的文章也大多是一个抄一个的,很多内容,原创作者已经很难找到了。第二,个别文章并不是很完善,如果不整理在一块,若下次碰到相同的内容,还是得网上再天翻地覆的搜一遍,太浪费时间了。第三,这些非原创的文章,不仅仅是给网友做参考,更重要的是,小麦苗自己也参考。毕竟人的记忆力是有限的,小麦苗也经常搜索自己的文章,所以,这并不可耻。第四,有的文章写得很好,但是里边有个别地方写得不严谨,或者写得有错误,这个时候,小麦苗整理到自己博客的时候就可以顺便修改过来。说再多,有的网友觉得,这都是借口,好吧。抄袭就是抄袭,再多借口也改变不了抄袭的本质。小麦苗不再多说了,只想说一句,不喜勿喷。
从今天开始,小麦苗会准备OCM和MySQL的学习。所以,今天就先把MySQL的各个版本安装一下吧。要学习MySQL,估计5.5、5.6和5.7版本的都需要安装。不过,相比Oracle而言,MySQL还是更好安装一点。
废话已经说了很多了,下面开始安装吧。
Linux下各种安装方法比较
在Windows下可以使用NOINSTALL包和图形化包来安装,在Linux下可以使用如下3种方式来安装:
| RPM(Redhat Package Manage) | 二进制(Binary Package) | 源码(Source Package) | |
|---|---|---|---|
| 优点 | 安装简单,适合初学者学习使用 | 安装简单;可以安装到任何路径下,灵活性好;一台服务器可以安装多个MySQL | 在实际安装的操作系统进行可根据需要定制编译,最灵活;性能最好;一台服务器可以安装多个MySQL |
| 缺点 | 需要单独下载客户端和服务器;安装路径不灵活,默认路径不能修改,一台服务器只能安装一个MySQL | 已经经过编译,性能不如源码编译的好;不能灵活定制编译参数 | 安装过程较复杂;编译时间长 |
| 文件布局 | /usr/bin:客户端程序和脚本 /usr/sbin:mysqld服务器 /var/lib/mysql:日志文件,数据库 /usr/share/doc/packages:文档 /usr/include/mysql:包含(头)文件 /usr/lib/mysql:库文件 /usr/share/mysql:错误消息和字符集文件 /usr/share/sql-bench:基准程序 | bin:客户端程序和mysqld服务器 data:日志文件,数据库 docs:文档,ChangeLog include:包含(头)文件 lib:库 scripts:mysql_install_db用来初始化系统数据库 share/mysql:错误消息文件 sql-bench:基准程序 | bin:客户端程序和脚本 include/mysql:包含(头)文件 info:Info格式的文档 lib/mysql:库文件 libexec:mysqld服务器 share/mysql:错误消息文件 sql-bench:基准程序和crash-me测试 var:数据库和日志文件 |
| 主要安装过程 | 在大多数情况下,下载MySQL-server和MySQL-client就可以了,安装方法如下: rpm -ivh MySQL-server* MySQL-client* | 1.添加用户 groupadd mysql useradd -g mysql mysql 2.安装 tar -xzvf mysql-VERSION-OS.tar.gz -C /mysql/ ln -s MySQL-VERSION-OS mysql或用mv命令 3.初始化,MySQL 5.7之后用mysqld --initialize scripts/mysql_install_db 4.启动数据库并修改密码等 mysqld_safe & set password=password('lhr'); | 除了第二步的安装过程外,其它步骤和二进制基本一样(MySQL 5.7开始使用cmake): gunzip \< mysql-VERSION.tar.gz | tar -xvf - cd mysql-VERSION ./configure --prefix=/usr/local/mysql make && make install |
| 安装包下载选项 | Red Hat Enterprise Linux / Oracle Linux | Linux - Generic | Source Code |
rpm的安装方式请参考:
http://blog.itpub.net/26736162/viewspace-1349705/
http://blog.itpub.net/26736162/viewspace-1349787/
官网中相应地有以上三种方式对应的下载链接,其中源码安装,对应"Source Code";.tar.gz对应"Linux - Generic",.rpm则对应于"Red Hat Enterprise Linux / Oracle Linux",如下图所示,
注意事项
- 目录大小。MySQL 5.7的二进制安装后大约3G,所以可以分配5G空间;而5.5和5.6版本的二进制包安装可以分配2G左右。
- MySQL 5.7的源码包需要分配10G的空间。cmake最低需要2.8.2版本。
- 下载和上传后需要校验md5值,防止上传的文件不完整。
- 源码编译安装比较费时费力。
MySQL下载
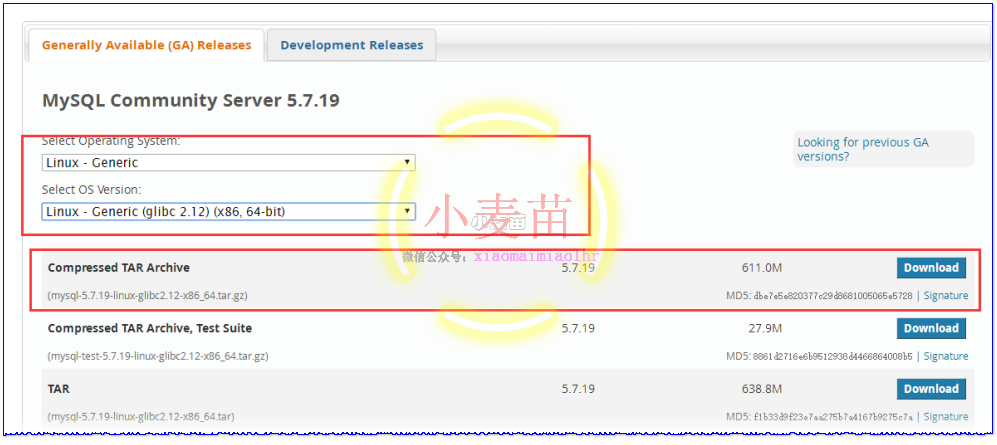
在官网:http://dev.mysql.com/downloads/mysql/中,选择以下版本的MySQL下载:
注意:MD5: dbe7e5e820377c29d8681005065e5728,下载完成后需要校验。
感觉MySQL的安装包越来越大了,不过相比Oracle而言,就小的多了。小麦苗已经将安装文件放到云盘了,参考:http://blog.itpub.net/26736162/viewspace-1624453/ 。
注意:不要下载rpm类型的包,安装路径不灵活,默认路径不能修改,一台服务器只能MySQL安装一个 MySQL。下图下载后均是rpm包:
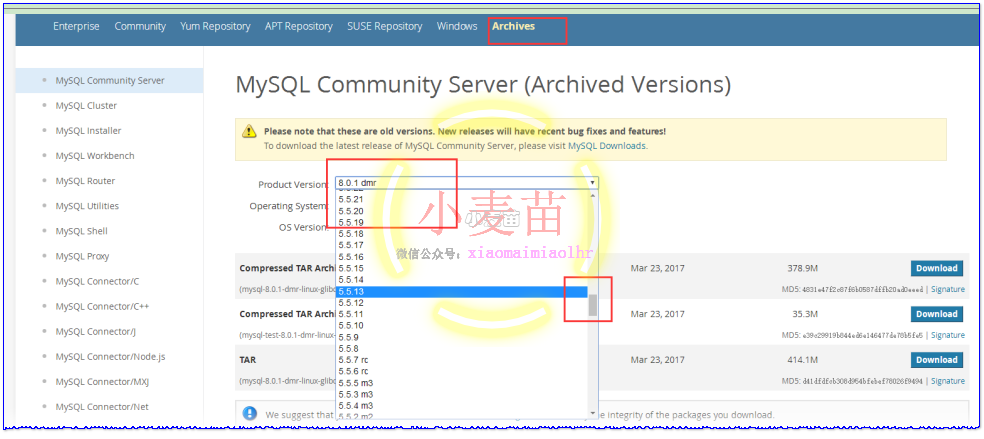
历史MySQL版本下载
地址:https://downloads.mysql.com/archives/community/,最早版本只能看到5.0.15
MySQL 5.7安装
下载
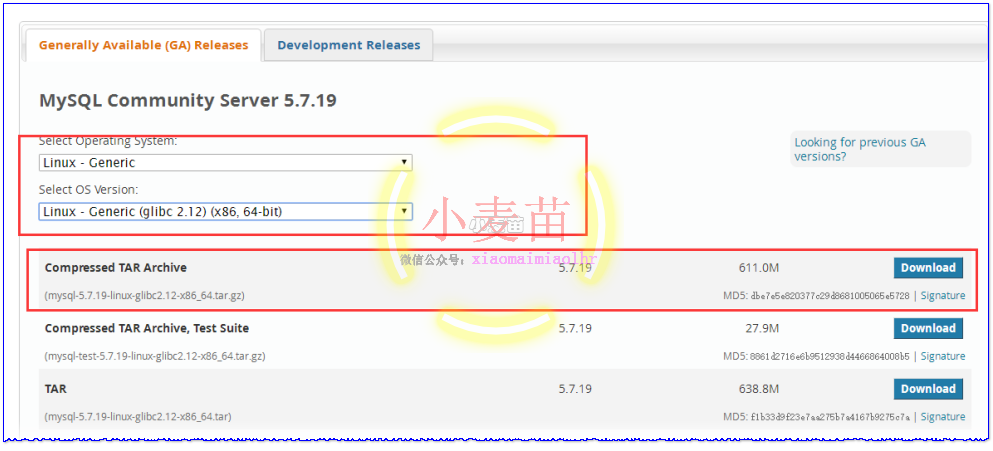
在官网:http://dev.mysql.com/downloads/mysql/中,选择以下版本的MySQL下载:
注意:MD5: dbe7e5e820377c29d8681005065e5728,下载完成后需要校验。
OS路径设置
我们约定:
| 项目 | source db |
|---|---|
| db 类型 | MySQL 5.7.19 |
| db version | 5.7.19 |
| db 存储 | Linux 文件系统 |
| OS版本及kernel版本 | RHEL 6.5 |
| OS主机名 | LHRDB |
| OS IP地址 | 192.168.59.159 |
| 安装文件下载目录 | /tmp/mysql5719 |
| MySQL目录安装位置 | /var/lib/mysql57/mysql5719 |
| 数据库保存位置 | /var/lib/mysql57/mysql5719/data |
| 日志保存位置 | /var/lib/mysql57/mysql5719/log |
| 配置文件地址 | /etc/my.cnf |
需要注意的是,安装文件解压后大小大约为2.6G,比MySQL 5.6大多了,我记得5.6版本解压后还不到1G。所以,这里安装目录给5G大小。
下面开始准备OS。使用以前就安装好的OS,文件系统采用逻辑卷的管理方式,如下所示:
1 2 3 4 5 6 7 8 9 10 11 12 13 14 15 16 17 18 19 20 21 22 23 24 25 26 27 28 29 30 31 32 33 34 35 36 37 38 39 40 41 42 43 44 45 46 47 48 49 50 51 52 53 54 55 56 57 58 59 60 61 62 63 64 65 66 67 68 69 70 71 72 73 74 75 76 77 78 79 80 81 82 83 84 85 86 87 88 89 90 91 92 93 94 95 96 97 98 99 100 | [root@LHRDB ~]# df -h Filesystem Size Used Avail Use% Mounted on /dev/mapper/vg_rootlhr-Vol00 9.9G 4.9G 4.6G 52% / tmpfs 2.0G 72K 2.0G 1% /dev/shm /dev/sda1 194M 35M 150M 19% /boot /dev/mapper/vg_rootlhr-Vol01 3.0G 70M 2.8G 3% /tmp /dev/mapper/vg_rootlhr-Vol03 3.0G 69M 2.8G 3% /home .host:/ 331G 272G 59G 83% /mnt/hgfs [root@LHRDB ~]# lvs LV VG Attr LSize Pool Origin Data% Move Log Cpy%Sync Convert Vol00 vg_rootlhr -wi-ao---- 10.00g Vol01 vg_rootlhr -wi-ao---- 3.00g Vol02 vg_rootlhr -wi-ao---- 2.00g Vol03 vg_rootlhr -wi-ao---- 3.00g [root@LHRDB ~]# pvs PV VG Fmt Attr PSize PFree /dev/sda2 vg_rootlhr lvm2 a-- 10.00g 0 /dev/sda3 vg_rootlhr lvm2 a-- 9.80g 1.80g /dev/sdb1 lvm2 a-- 10.00g 10.00g /dev/sdb10 lvm2 a-- 10.00g 10.00g /dev/sdb11 lvm2 a-- 9.99g 9.99g /dev/sdb2 lvm2 a-- 10.00g 10.00g /dev/sdb3 lvm2 a-- 10.00g 10.00g /dev/sdb5 lvm2 a-- 10.00g 10.00g /dev/sdb6 lvm2 a-- 10.00g 10.00g /dev/sdb7 lvm2 a-- 10.00g 10.00g /dev/sdb8 lvm2 a-- 10.00g 10.00g /dev/sdb9 lvm2 a-- 10.00g 10.00g [root@LHRDB ~]# vgs VG #PV #LV #SN Attr VSize VFree vg_rootlhr 2 4 0 wz--n- 19.80g 1.80g [root@LHRDB ~]# vgcreate vg_mysqlsoft /dev/sdb1 Volume group "vg_mysqlsoft" successfully created [root@LHRDB ~]# vgs VG #PV #LV #SN Attr VSize VFree vg_mysqlsoft 1 0 0 wz--n- 10.00g 10.00g vg_rootlhr 2 4 0 wz--n- 19.80g 1.80g [root@LHRDB ~]# lvcreate -n lv_mysqlsoft_57 -L 5G vg_mysqlsoft Logical volume "lv_mysqlsoft_57" created [root@LHRDB ~]# lvs LV VG Attr LSize Pool Origin Data% Move Log Cpy%Sync Convert lv_mysqlsoft_57 vg_mysqlsoft -wi-a----- 5.00g Vol00 vg_rootlhr -wi-ao---- 10.00g Vol01 vg_rootlhr -wi-ao---- 3.00g Vol02 vg_rootlhr -wi-ao---- 2.00g Vol03 vg_rootlhr -wi-ao---- 3.00g [root@LHRDB ~]# mkfs.ext4 /dev/vg_mysqlsoft/lv_mysqlsoft_57 mke2fs 1.41.12 (17-May-2010) Filesystem label= OS type: Linux Block size=4096 (log=2) Fragment size=4096 (log=2) Stride=0 blocks, Stripe width=0 blocks 327680 inodes, 1310720 blocks 65536 blocks (5.00%) reserved for the super user First data block=0 Maximum filesystem blocks=1342177280 40 block groups 32768 blocks per group, 32768 fragments per group 8192 inodes per group Superblock backups stored on blocks: 32768, 98304, 163840, 229376, 294912, 819200, 884736 Writing inode tables: done Creating journal (32768 blocks): done Writing superblocks and filesystem accounting information: done This filesystem will be automatically checked every 32 mounts or 180 days, whichever comes first. Use tune2fs -c or -i to override. [root@LHRDB ~]# mkdir -p /tmp/mysql5719 [root@LHRDB ~]# mkdir -p /var/lib/mysql57 [root@LHRDB ~]# mount /dev/vg_mysqlsoft/lv_mysqlsoft_57 /var/lib/mysql57/ [root@LHRDB ~]# df -h Filesystem Size Used Avail Use% Mounted on /dev/mapper/vg_rootlhr-Vol00 9.9G 4.9G 4.6G 52% / tmpfs 2.0G 72K 2.0G 1% /dev/shm /dev/sda1 194M 35M 150M 19% /boot /dev/mapper/vg_rootlhr-Vol01 3.0G 680M 2.2G 24% /tmp /dev/mapper/vg_rootlhr-Vol03 3.0G 69M 2.8G 3% /home .host:/ 331G 272G 59G 83% /mnt/hgfs /dev/mapper/vg_mysqlsoft-lv_mysqlsoft_57 5.0G 138M 4.6G 3% /var/lib/mysql57 [root@LHRDB ~]# vi /etc/fstab [root@LHRDB ~]# more /etc/fstab # /etc/fstab # Created by anaconda on Sat Jan 14 18:56:24 2017 # # Accessible filesystems, by reference, are maintained under '/dev/disk' # See man pages fstab(5), findfs(8), mount(8) and/or blkid(8) for more info # /dev/mapper/vg_rootlhr-Vol00 / ext4 defaults 1 1 UUID=fccf51c1-2d2f-4152-baac-99ead8cfbc1a /boot ext4 defaults 1 2 /dev/mapper/vg_rootlhr-Vol01 /tmp ext4 defaults 1 2 /dev/mapper/vg_rootlhr-Vol02 swap swap defaults 0 0 tmpfs /dev/shm tmpfs defaults,size=2G 0 0 devpts /dev/pts devpts gid=5,mode=620 0 0 sysfs /sys sysfs defaults 0 0 proc /proc proc defaults 0 0 /dev/vg_rootlhr/Vol03 /home ext4 defaults 0 0 /dev/mapper/vg_mysqlsoft-lv_mysqlsoft_57 /var/lib/mysql57 ext4 defaults 0 0 |
OS设置
1 2 3 4 5 6 7 | 关闭iptables防火墙: 临时关闭:service iptables stop 永久关闭:chkconfig iptables off 关闭selinux vi /etc/sysconfig/selinux 将SELINUX修改为DISABLED,即SELINUX=DISABLED |
上传文件并校验MD5值
1 2 3 4 5 6 7 | [root@LHRDB ~]# cd /tmp/mysql5719/ [root@LHRDB mysql5719]# ll total 625640 -rw-r--r--. 1 root root 640650826 Aug 23 10:48 mysql-5.7.19-linux-glibc2.12-x86_64.tar.gz [root@LHRDB mysql5719]# md5sum mysql-5.7.19-linux-glibc2.12-x86_64.tar.gz dbe7e5e820377c29d8681005065e5728 mysql-5.7.19-linux-glibc2.12-x86_64.tar.gz |
和官网的MD5保持一致,说明安装文件的下载和上传过程没有问题:
| Compressed TAR Archive | 5.7.19 | 611.0M | Download |
|---|---|---|---|
| (mysql-5.7.19-linux-glibc2.12-x86_64.tar.gz) | MD5: dbe7e5e820377c29d8681005065e5728 | Signature |
安装
1 2 3 4 5 6 7 8 9 10 11 12 13 14 15 16 17 18 19 20 21 22 23 24 25 26 27 28 29 30 31 | [root@LHRDB mysql5719]# tar -zxvf mysql-5.7.19-linux-glibc2.12-x86_64.tar.gz -C /var/lib/mysql57/ mysql-5.7.19-linux-glibc2.12-x86_64/bin/myisam_ftdump mysql-5.7.19-linux-glibc2.12-x86_64/bin/myisamchk mysql-5.7.19-linux-glibc2.12-x86_64/bin/myisamlog mysql-5.7.19-linux-glibc2.12-x86_64/bin/myisampack mysql-5.7.19-linux-glibc2.12-x86_64/bin/mysql mysql-5.7.19-linux-glibc2.12-x86_64/bin/mysql_client_test_embedded mysql-5.7.19-linux-glibc2.12-x86_64/bin/mysql_config_editor mysql-5.7.19-linux-glibc2.12-x86_64/bin/mysql_embedded mysql-5.7.19-linux-glibc2.12-x86_64/bin/mysql_install_db mysql-5.7.19-linux-glibc2.12-x86_64/bin/mysql_plugin 。。。。。。。 省略部分。。。。。。。。 mysql-5.7.19-linux-glibc2.12-x86_64/lib/libmysqlclient.so.20 mysql-5.7.19-linux-glibc2.12-x86_64/lib/libmysqlclient.so.20.3.6 mysql-5.7.19-linux-glibc2.12-x86_64/share/install_rewriter.sql mysql-5.7.19-linux-glibc2.12-x86_64/share/uninstall_rewriter.sql mysql-5.7.19-linux-glibc2.12-x86_64/support-files/magic mysql-5.7.19-linux-glibc2.12-x86_64/support-files/mysql.server mysql-5.7.19-linux-glibc2.12-x86_64/docs/INFO_BIN mysql-5.7.19-linux-glibc2.12-x86_64/docs/INFO_SRC [root@LHRDB mysql5719]# df -h Filesystem Size Used Avail Use% Mounted on /dev/mapper/vg_rootlhr-Vol00 9.9G 4.9G 4.6G 52% / tmpfs 2.0G 72K 2.0G 1% /dev/shm /dev/sda1 194M 35M 150M 19% /boot /dev/mapper/vg_rootlhr-Vol01 3.0G 680M 2.2G 24% /tmp /dev/mapper/vg_rootlhr-Vol03 3.0G 69M 2.8G 3% /home .host:/ 331G 272G 59G 83% /mnt/hgfs /dev/mapper/vg_mysqlsoft-lv_mysqlsoft_57 5.0G 2.6G 2.2G 55% /var/lib/mysql57 |
重命名安装后的文件夹
1 2 3 4 5 6 7 8 9 10 11 12 13 | [root@LHRDB ~]# cd /var/lib/mysql57/ [root@LHRDB mysql57]# ll total 20 drwx------. 2 root root 16384 Aug 23 13:21 lost+found drwxr-xr-x. 9 root root 4096 Aug 23 13:28 mysql-5.7.19-linux-glibc2.12-x86_64 [root@LHRDB mysql57]# mv mysql-5.7.19-linux-glibc2.12-x86_64 mysql5719 [root@LHRDB mysql57]# ll total 20 drwx------. 2 root root 16384 Aug 23 13:21 lost+found drwxr-xr-x. 9 root root 4096 Aug 23 13:28 mysql5719 [root@LHRDB mysql57]# |
也可以使用ln连接:
1 2 | ln –s mysql-5.7.19-linux-glibc2.12-x86_64 mysql5719 |
新建数据和日志文件目录
1 2 3 | [root@LHRDB mysql57]# mkdir -p /var/lib/mysql57/mysql5719/data [root@LHRDB mysql57]# mkdir -p /var/lib/mysql57/mysql5719/log |
用户和组设置
groupadd mysql ## 添加一个mysql组
useradd -r -g mysql mysql ## 添加一个用户
useradd -r -s /sbin/nologin -g mysql mysql -d /usr/local/mysql #新建msyql用户禁止登录shell
1 2 3 4 5 | [root@LHRDB ~]# groupadd mysql groupadd: group 'mysql' already exists [root@LHRDB ~]# useradd -r -g mysql mysql useradd: user 'mysql' already exists |
说明本身就有mysql用户和组。
改变目录属有者
1 2 3 4 5 | [root@LHRDB mysql57]# chown –R mysql.mysql /var/lib/mysql57 chown: invalid user: `\226R' [root@LHRDB mysql57]# cd .. [root@LHRDB lib]# chown –R mysql.mysql /var/lib/mysql57 |
初始化MySQL
注意:MySQL 5.7.6之后的版本初始化数据库不再使用mysql_install_db,但是在MySQL 5.7.19里依然保留着这个文件。
官网:https://dev.mysql.com/doc/refman/5.7/en/mysql-install-db.html
mysql_install_db is deprecated as of MySQL 5.7.6 because its functionality has been integrated into mysqld, the MySQL server. To initialize a MySQL installation, invoke mysqld with the --initialize or --initialize-insecure option. For more information, see Section 2.10.1.1, “Initializing the Data Directory Manually Using mysqld”. mysql_install_db will be removed in a future MySQL release.
1 2 3 4 5 6 7 8 9 10 11 12 13 14 15 16 17 18 19 20 21 22 | [root@LHRDB mysql5719]# ll total 60 drwxr-xr-x. 2 mysql mysql 4096 Aug 23 13:27 bin -rw-r--r--. 1 mysql mysql 17987 Jun 22 22:13 COPYING drwxr-xr-x. 2 mysql mysql 4096 Aug 23 13:35 data drwxr-xr-x. 2 mysql mysql 4096 Aug 23 13:28 docs drwxr-xr-x. 3 mysql mysql 4096 Aug 23 13:27 include drwxr-xr-x. 5 mysql mysql 4096 Aug 23 13:28 lib drwxr-xr-x. 2 mysql mysql 4096 Aug 23 13:35 log drwxr-xr-x. 4 mysql mysql 4096 Aug 23 13:27 man -rw-r--r--. 1 mysql mysql 2478 Jun 22 22:13 README drwxr-xr-x. 28 mysql mysql 4096 Aug 23 13:28 share drwxr-xr-x. 2 mysql mysql 4096 Aug 23 13:28 support-files [root@LHRDB mysql5719]# ./bin/mysqld --initialize --user=mysql --basedir=/var/lib/mysql57/mysql5719 --datadir=/var/lib/mysql57/mysql5719/data 2017-08-23T05:45:58.820448Z 0 [Warning] TIMESTAMP with implicit DEFAULT value is deprecated. Please use --explicit_defaults_for_timestamp server option (see documentation for more details). 2017-08-23T05:45:59.123446Z 0 [Warning] InnoDB: New log files created, LSN=45790 2017-08-23T05:45:59.197904Z 0 [Warning] InnoDB: Creating foreign key constraint system tables. 2017-08-23T05:45:59.273227Z 0 [Warning] No existing UUID has been found, so we assume that this is the first time that this server has been started. Generating a new UUID: 571ab53c-87c6-11e7-ab76-000c291823c2. 2017-08-23T05:45:59.276384Z 0 [Warning] Gtid table is not ready to be used. Table 'mysql.gtid_executed' cannot be opened. 2017-08-23T05:45:59.277461Z 1 [Note] A temporary password is generated for root@localhost: k;A3Dktywkyj [root@LHRDB mysql5719]# |
这里生成的临时密码为:k;A3Dktywkyj
该过程会在data目录下生成默认数据库:
[root@LHRDB mysql5719]# cd data
[root@LHRDB data]# ll
total 110620
-rw-r-----. 1 mysql mysql 56 Aug 23 13:45 auto.cnf
-rw-r-----. 1 mysql mysql 420 Aug 23 13:46 ib_buffer_pool
-rw-r-----. 1 mysql mysql 12582912 Aug 23 13:46 ibdata1
-rw-r-----. 1 mysql mysql 50331648 Aug 23 13:46 ib_logfile0
-rw-r-----. 1 mysql mysql 50331648 Aug 23 13:45 ib_logfile1
drwxr-x---. 2 mysql mysql 4096 Aug 23 13:45 mysql
drwxr-x---. 2 mysql mysql 4096 Aug 23 13:45 performance_schema
drwxr-x---. 2 mysql mysql 12288 Aug 23 13:46 sys
[root@LHRDB data]# du -sh .
122M .
生成秘钥
创建SSL和RSA文件,关于这部分更多请参考:https://dev.mysql.com/doc/refman/5.7/en/mysql-ssl-rsa-setup.html。也可以不执行这个步骤。
1 2 3 4 5 6 7 8 9 10 11 12 13 14 15 16 17 18 | [root@LHRDB mysql5719]# ./bin/mysql_ssl_rsa_setup --datadir=/var/lib/mysql57/mysql5719/data Generating a 2048 bit RSA private key ................................................................................................................+++ ............................+++ writing new private key to 'ca-key.pem' ----- Generating a 2048 bit RSA private key ......................................+++ .................+++ writing new private key to 'server-key.pem' ----- Generating a 2048 bit RSA private key ........................+++ .................................................................+++ writing new private key to 'client-key.pem' ----- |
配置/etc/my.cnf
生产库上根据需要配置更多参数:
[root@LHRDB support-files]# more /etc/my.cnf
[client]
port=3306
socket=/var/lib/mysql57/mysql.sock
[mysqld]
basedir=/var/lib/mysql57/mysql5719
datadir=/var/lib/mysql57/mysql5719/data
socket=/var/lib/mysql57/mysql.sock
user=mysql
# Disabling symbolic-links is recommended to prevent assorted security risks
symbolic-links=0
[mysqld_safe]
log-error=/var/lib/mysql57/mysql5719/log/mysqld.log
pid-file=/var/lib/mysql57/mysql5719/data/mysqld.pid
配置开机启动文件
1 2 3 4 5 6 7 8 9 10 11 12 13 14 | [root@LHRDB mysql5719]# cd support-files/ [root@LHRDB support-files]# ll total 24 -rw-r--r--. 1 mysql mysql 773 Jun 22 22:13 magic -rwxr-xr-x. 1 mysql mysql 1061 Jun 22 22:54 mysqld_multi.server -rwxr-xr-x. 1 mysql mysql 894 Jun 22 22:54 mysql-log-rotate -rwxr-xr-x. 1 mysql mysql 10576 Jun 22 22:54 mysql.server [root@LHRDB support-files]# cp mysql.server /etc/init.d/mysql57 [root@LHRDB support-files]# chmod 755 /etc/init.d/mysql57 [root@LHRDB support-files]# chkconfig --add mysql57 [root@LHRDB support-files]# chkconfig mysql57 on [root@LHRDB support-files]# chkconfig --level 345 mysql57 on |
注意:这里的MySQL服务为mysql57
启动MySQL
1 2 3 4 5 6 7 8 9 10 11 12 13 14 15 16 17 18 19 20 21 22 23 24 25 26 27 28 29 30 31 | [root@LHRDB support-files]# service mysql57 start Starting MySQL.2017-08-23T06:18:23.060126Z mysqld_safe error: log-error set to '/var/lib/mysql57/mysql5719/log/mysqld.log', however file don't exists. Create writable for user 'mysql'. The server quit without updating PID file (/var/lib/mysql57/mysql5719/data/LHRDB.pid).[FAILED] [root@LHRDB support-files]# cd /var/lib/mysql57/mysql5719/log/ [root@LHRDB log]# ll total 0 [root@LHRDB log]# cd .. [root@LHRDB mysql5719]# ll total 60 drwxr-xr-x. 2 mysql mysql 4096 Aug 23 13:27 bin -rw-r--r--. 1 mysql mysql 17987 Jun 22 22:13 COPYING drwxr-xr-x. 5 mysql mysql 4096 Aug 23 13:46 data drwxr-xr-x. 2 mysql mysql 4096 Aug 23 13:28 docs drwxr-xr-x. 3 mysql mysql 4096 Aug 23 13:27 include drwxr-xr-x. 5 mysql mysql 4096 Aug 23 13:28 lib drwxr-xr-x. 2 mysql mysql 4096 Aug 23 13:35 log drwxr-xr-x. 4 mysql mysql 4096 Aug 23 13:27 man -rw-r--r--. 1 mysql mysql 2478 Jun 22 22:13 README drwxr-xr-x. 28 mysql mysql 4096 Aug 23 13:28 share drwxr-xr-x. 2 mysql mysql 4096 Aug 23 13:28 support-files [root@LHRDB mysql5719]# echo '' > /var/lib/mysql57/mysql5719/log/mysqld.log [root@LHRDB mysql5719]# chown mysql.mysql /var/lib/mysql57/mysql5719/log/mysqld.log [root@LHRDB mysql5719]# service mysql57 start Starting MySQL.[ OK ] [root@LHRDB mysql5719]# ps -ef|grep mysql root 18194 1 0 14:20 pts/1 00:00:00 /bin/sh /var/lib/mysql57/mysql5719/bin/mysqld_safe --datadir=/var/lib/mysql57/mysql5719/data --pid-file=/var/lib/mysql57/mysql5719/data/LHRDB.pid mysql 18370 18194 0 14:20 pts/1 00:00:00 /var/lib/mysql57/mysql5719/bin/mysqld --basedir=/var/lib/mysql57/mysql5719 --datadir=/var/lib/mysql57/mysql5719/data --plugin-dir=/var/lib/mysql57/mysql5719/lib/plugin --user=mysql --log-error=/var/lib/mysql57/mysql5719/log/mysqld.log --pid-file=/var/lib/mysql57/mysql5719/data/LHRDB.pid --socket=/var/lib/mysql57/mysql.sock root 18407 13196 0 14:21 pts/1 00:00:00 grep mysql [root@LHRDB mysql5719]# |
或者:
1 2 3 4 5 6 7 8 | [root@LHRDB ~]# which mysqld_safe /var/lib/mysql57/mysql5719/bin/mysqld_safe [root@LHRDB ~]# mysqld_safe --user=mysql & [1] 18674 [root@LHRDB ~]# 2017-08-23T06:40:04.996137Z mysqld_safe Logging to '/var/lib/mysql57/mysql5719/log/mysqld.log'. 2017-08-23T06:40:05.053483Z mysqld_safe Starting mysqld daemon with databases from /var/lib/mysql57/mysql5719/data |
配置环境变量
编辑文件/etc/profile,在最后添加如下的内容:
1 2 | MYSQL_HOME=/var/lib/mysql57/mysql5719 PATH=$PATH:$MYSQL_HOME/bin |
让环境变量生效:source /etc/profile
登录MySQL并修改密码
1 2 3 4 5 6 7 8 9 10 11 12 13 14 15 16 17 18 19 20 21 22 23 24 25 26 27 28 29 30 31 32 33 | [root@LHRDB ~]# mysql -p Enter password: ---》临时密码为:k;A3Dktywkyj Welcome to the MySQL monitor. Commands end with ; or \g. Your MySQL connection id is 3 Server version: 5.7.19 Copyright (c) 2000, 2017, Oracle and/or its affiliates. All rights reserved. Oracle is a registered trademark of Oracle Corporation and/or its affiliates. Other names may be trademarks of their respective owners. Type 'help;' or '\h' for help. Type '\c' to clear the current input statement. mysql> mysql> show databases; ERROR 1820 (HY000): You must reset your password using ALTER USER statement before executing this statement. mysql> set password=password('lhr'); Query OK, 0 rows affected, 1 warning (0.02 sec) mysql> show databases; +--------------------+ | Database | +--------------------+ | information_schema | | mysql | | performance_schema | | sys | +--------------------+ 4 rows in set (0.04 sec) |
修改密码也可以用:update mysql.user set authentication_string=password('lhr') where user='root';
设置远程登录
1 2 3 4 5 6 7 8 9 10 11 12 13 14 15 16 17 18 19 20 21 22 23 24 25 26 27 28 29 30 31 32 33 34 | mysql> grant all privileges on *.* to root@'%' identified by 'lhr'; Query OK, 0 rows affected, 1 warning (0.00 sec) mysql> flush privileges; Query OK, 0 rows affected (0.00 sec) mysql> select host,user from mysql.user; +-----------+---------------+ | host | user | +-----------+---------------+ | % | root | | localhost | mysql.session | | localhost | mysql.sys | | localhost | root | +-----------+---------------+ 4 rows in set (0.00 sec) [root@LHRDB ~]# mysql -uroot -plhr -h192.168.59.159 mysql: [Warning] Using a password on the command line interface can be insecure. Welcome to the MySQL monitor. Commands end with ; or \g. Your MySQL connection id is 4 Server version: 5.7.19 MySQL Community Server (GPL) Copyright (c) 2000, 2017, Oracle and/or its affiliates. All rights reserved. Oracle is a registered trademark of Oracle Corporation and/or its affiliates. Other names may be trademarks of their respective owners. Type 'help;' or '\h' for help. Type '\c' to clear the current input statement. mysql> |
Windows远程登录
在Windows下远程登录:
1 2 3 4 5 6 7 8 9 10 11 12 13 14 15 16 | D:\Users\xiaomaimiao>mysql -uroot -plhr -h192.168.59.159 Warning: Using a password on the command line interface can be insecure. Welcome to the MySQL monitor. Commands end with ; or \g. Your MySQL connection id is 6 Server version: 5.7.19 MySQL Community Server (GPL) Copyright (c) 2000, 2014, Oracle and/or its affiliates. All rights reserved. Oracle is a registered trademark of Oracle Corporation and/or its affiliates. Other names may be trademarks of their respective owners. Type 'help;' or '\h' for help. Type '\c' to clear the current input statement. mysql> |
可能会出现下面的错误:
D:\Users\xiaomaimiao>mysql -uroot -plhr -h192.168.59.159
Warning: Using a password on the command line interface can be insecure.
ERROR 2003 (HY000): Can't connect to MySQL server on '192.168.59.159' (10060)
原因:主机192.168.59.159上的防火墙未关闭
解决办法:关闭防火墙,以下2个命令都需要执行:
chkconfig iptables off ---永久


